We wonder how many of us are guilty of ignoring dripping taps in our home, purely because it is another thing on our ever growing ‘to do’ list that doesn’t seem worthy of bumping to the top? Well, that annoying drip may seem harmless, but it can add up to tons of wasted water, not to mention the money you will be throwing down the drain. According to water.org.uk a dripping tap wastes at least 5,000 litres of water a year, and if you need a visual for that, we’re talking enough water to fill a paddling pool every week for the whole of summer! On top of that, uncurbed leaking taps left to run amok will only lead to damage to your home later down the line.
The good news is, dripping taps are easy to fix if you catch the leak early enough. If you’re asking yourself, why is my tap leaking, and you want to have a go at resolving a maddening drip yourself, this article will take you through everything you need to know to achieve success!
What causes a tap to drip?
The origin of tap drips can differ depending on the type of tap you have. Tap leaks are often the result of failing rubber seals and tap washers within the taps make up. Limescale can form on the seals, or they tend to simply wear down overtime. Luckily, you can replace the washer, seals, or O-rings quickly and easily.
In modern lever style taps, the built-in cartridge inside the tap may also be the cause of the drip. With many models, this can be removed, and either descaled or completely replace to resolve the problem.
Let us take a closer look at the distinct types of taps on the market, so you can identify which type you may have and therefore, what you may need to do to fix it…
Types of taps
Appearance, price, height and tap reach are all factors that you should consider when choosing a new tap. However, there are typically two tap types to opt for:
Traditional taps
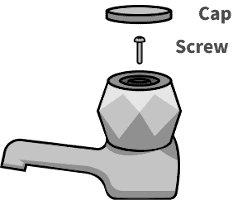
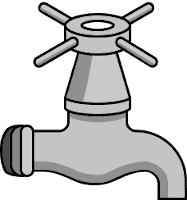
Traditional taps, such as Pillar Taps, are mounted on a basin or bath, with separate taps for hot and cold water. For the tap handles, you can choose a modern lever style or a more traditional cross, round, or club style handle that needs to turn multiple times to turn the tap on and off. In traditional water tap types, dripping is caused by a damaged washer/seal that should be replaced.

Monobloc lever taps
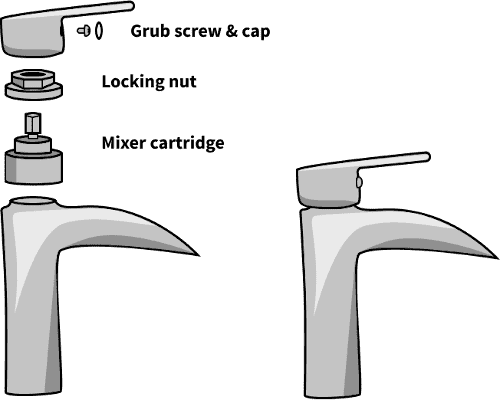
It sounds complicated, but a Monobloc tap is simply the name given to the type of tap that has a single spout for both hot and cold water (aka mixer taps). The tap tends to have a single handle that allows you to choose the temperature of water with a single quarter or half turn to the right or left. In a Monobloc tap, leaking is caused by a damaged ceramic cartridge. Replacing the whole cartridge is normally the required solution.
In our experience, Monobloc lever taps are the most common and popular variety of mixer tap in kitchens in the UK. They vary in variety from the swan neck type, through to pull out kitchen taps and filtered water taps.
Tools you will need to fix a dripping tap
- Channel lock – great for grabbing and pinching objects.
- Adjustable spanner – for tightening and loosening.
- Philips screwdriver (cross-shaped head) – good for coping with higher torsion.
- Flat head screwdriver – its flattened tip is needed for screws with a straight linear intrusion across the head.
- Small Allen key – you may need this to loosen the screw underneath the handle (to remove the handle)
- A replacement cartridge or assorted tap washers and replacement O-rings (depending on the type of tap you are fixing).
How to fix a dripping tap
– Monobloc lever tap
As the UK’s most popular type of kitchen tap, we are going to walk you through replacing the cartridge on a Monobloc lever tap. A broken ceramic disc can cause the tap to leak, forcing you to replace the whole cartridge.
Isolate or turn off the water supply. To avoid any more water escaping, isolate the water supply locally. This will mean you can turn off the water to the specific tap that needs fixing, but still have operational taps in the other rooms in your house. Simply find the isolation valve, which should be local to the tap (i.e. below the sink) and using a screwdriver, turn the valve a quarter turn to the left or right.
Remove the top cap (this normally has the ‘c’ for cold water or ‘h’ for hot water on) with a screwdriver.
Unscrew the tap head using a Philips screwdriver to remove.
Once you have removed the tap head grub screw that is holding the tap head in place (make sure you keep it in a safe place), the head should come off easily and the ceramic mixer cartridge will be visible.
Using your adjustable spanner, loosen and turn the cartridge until it is free. Be careful of any excess (trapped) water that escapes at this point – have a cloth to hand just in case.
Head down to your local plumbing merchants/Screwfix with the old/faulty ceramic cartridge you have removed to get a replacement. Taking the old cartridge and the tap head with you will help you marry up the two parts and get an exact replica cartridge.
Place you new cartridge back into the tap housing, turn it clockwise by hand until you cannot turn it further. Use your adjustable spanner to tighten it up.
Put your tap head back on, making sure both taps are in the ‘off’ position. Replace the grub screw (that you put in safe place) by using your Philips screwdriver.
Replace the top cap.
Turn the water back on by turning the ball valve underneath the sink, a quarter turn.
Once everything is in place, check the tap is working properly.
Top tip:
To try and avoid a dripping tap, make sure that you have the right water pressure and never over-tighten the tap fixtures.
Not confident in conducting DIY repairs? Then consider enlisting the help of a professional plumber. If you call a plumber to carry out repairs, you will not free up your time, but you will ensure the repairs are conducted correctly, avoiding the risk of correcting costly mistakes further down the line.